Using the Plugin
Please ensure you have the SteelShield plugin correctly set up as described in the Getting Started section.
To use the SteelShield Plugin from within your game, you first need to configure the settings unique to your game, initialize the subsystem and provide it with a token provider which the subsystem can use to get new tokens, and finally call start on the subsystem to get it to do an initial token request, and subsequent rollover token requests.
Configuration
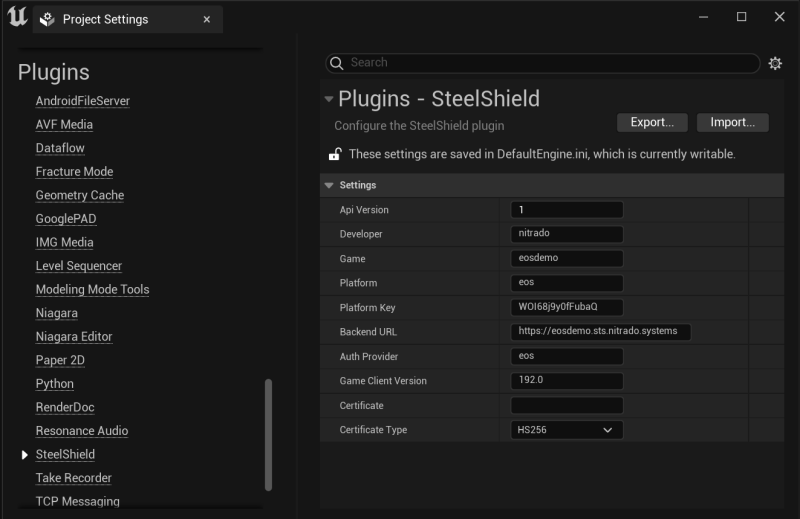
Before you begin using the plugin, you need to set up the configuration parameters that are used by the plugin to communicate with the SteelShield Token Service.
These parameters should be provided to you by Nitrado, and can be configured by going to Settings→Project Settings→Plugins→SteelShield in the Unreal Editor.

- Api Version —
SteelShield Token Serviceend point API version - Developer — The name of your company
- Game — The name of the game you are integrating SteelShield with
- Platform — The platform on which this version of the game is for (PC/PS5/XBox etc) or a generic platform in the case of a non-platform specific token service
- Platform Key — Unique secret key for this game provided by Nitrado. This is used by the
SteelShield Token Serviceto authenticate the token requests. Keep this secret! - Backend URL — Base URL of the
SteelShield Token Service - Auth Provider — Provider used to issue the JWT token
- Game Client Version — Current version of the game
- Certificate — Certificate used for signing the JWT in the case of using the
Default Token Providerin testing - Certificate Type — Type of certificate used above. Only used when using
Default Token Providerin testing
Initializing the Plugin
This needs to be done via C++ code, and should happen early on in the games startup phase. A good place to put the initialization is right after the player has been logged into the backend server.
In the below example, the SteelShield subsystem is being initialized right after a successful login to the Epic Online Services, and is using the EOSTokenService.
// NOTE: Error handling has been removed for brevity

IOnlineSubsystem *Subsystem = Online::GetSubsystem(WorldContextObject->GetWorld());
IOnlineIdentityPtr Identity = Subsystem->GetIdentityInterface();

// Set up SteelShield EOS Token Provider
auto *SteelShield = GetGameInstance()->
                    GetEngine()->
                    GetEngineSubsystem<USteelShieldSubsystem>();

const auto TokenProvider =
    SteelShield->
    SetTokenProvider<UEOSTokenProvider>(UEOSTokenProvider::StaticClass());

TokenProvider->Init(Identity, LocalUserNum);
After the initialization has taken place, you should not need to initialize the subsystem again until the game is restarted or in the case of the EOSTokenProvider, the user logs out of EOS.
Starting the Plugin
Starting the plugin should take place right before the user attempts to join a server. By starting the plugin, the subsystem makes a request to the backend SteelShield Token Service using the JWT/TokenProvider given during initialization process. This then allows the engine component to begin "wrapping" the network packets with a SteelShield Token.
Note
The engine components still "wrap" packets with an invalid/uninitialized token if the subsystem is not started. This causes any network packets to be dropped by the SteelShield firewall network appliance on the path to the game server. There is no effect on networks or game servers that do not pass though the SteelShield firewall network appliance.
Once the subsystem has been started, it keeps track of the expiry time of tokens, and before tokens expire (usually 15 minutes), it makes another request to the SteelShield Token Service to renew its token, and then performs a token rollover process with the game server.
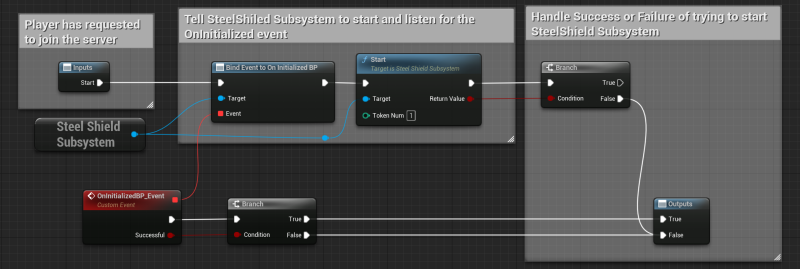
You need to attach to the OnInitialized (for C++) or OnInitializedBP (for Blueprints) event to know if the SteelShield subsystem could communicate with the backend token service and start correctly. Only on a successful OnInitialized event should you continue to join the server.
You need to supply the number of Tokens which the subsystem should request from the Token server. There should be 1 token per network connection you wish to make to the Game Server. In most normal scenarios this would be 1.
Example of starting the subsystem in Blueprints

Example of starting the subsystem in C++
// Player has requested to join the server
const auto SteelShield = GetGameInstance()->
                         GetEngine()->
                         GetEngineSubsystem<USteelShieldSubsystem>();

OnInitializedHandle =
    SteelShield->
    OnInitialized.AddUObject(this, &ThisClass::OnSteelShieldInitialized);

const bool bSuccess = SteelShield->Start(4);

if (!bSuccess)
{
        UE_LOG(LogTemp, Error, TEXT("Failed to start SteelShield"));
        return;
}void ACustomController::OnSteelShieldInitialized(bool bSuccess)
{
const auto SteelShield = GetGameInstance()->
GetEngine()->
GetEngineSubsystem<USteelShieldSubsystem>();
SteelShield->OnInitialized.Remove(OnInitializedHandle);
if(!bSuccess)
{
UE_LOG(LogTemp, Error, TEXT("Failed to start SteelShield"));
return;
}
// The subsystem started without error, continue to connect to server
ClientTravel(ServerAddress, TRAVEL_Absolute);
}Stopping the Plugin
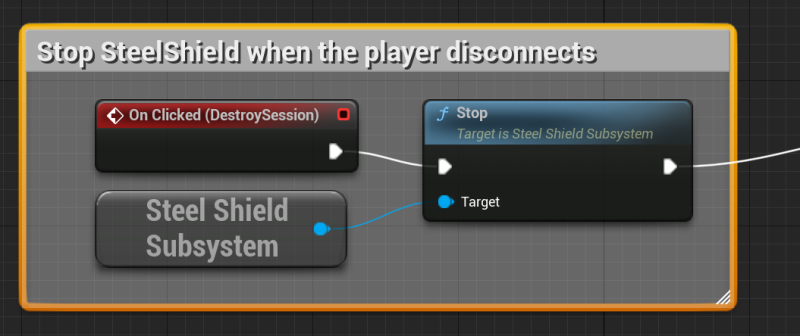
When the player disconnects from the server, you should stop the plugin. This prevents the plugin from continuing to perform rollover checks in the background, and forces it to retrieve new token when the plugin is started again.
Example of stopping the subsystem via Blueprints:

Example of stopping the subsystem via C++:
const auto SteelShield = GetGameInstance()->
                         GetEngine()->
                         GetEngineSubsystem<USteelShieldSubsystem>();

SteelShield->Stop();
Enabling Logging
All SteelShield Plugin logs are written to LogSteelShield, and other relevant logs written to LogNet. You can enable this log category and set the default log level to Verbose to see what is happening with the plugin by adding the following section to your DefaultEngine.ini file
[Core.Log]
LogSteelShield=Verbose
LogNet=Verbose